

4 Techniques to Shibori Tie Dye Your T-Shirt
By ShirtSpace | Aug 23, 2019 | Updated Feb 06, 2024Shibori Tie Dye
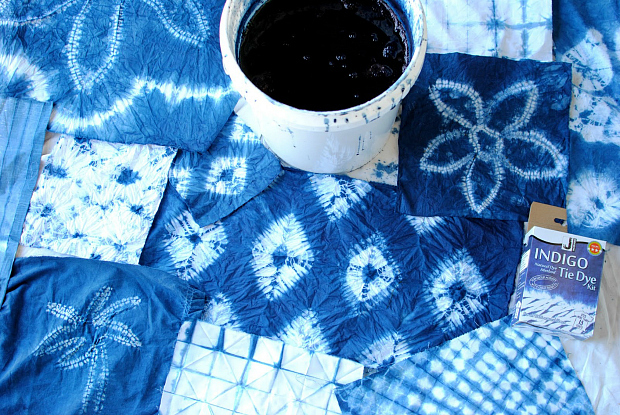
Hello, everyone! Laura here from Trash to Couture sharing with you 4 ways to tie dye t-shirts using techniques from Shibori. A little different than tie dye, Shibori is a Japanese method of dyeing patterns by twisting, binding, wrapping, folding, and stitching. The main dye used for this technique is Indigo because of its easy to create resist patterns on fabric. Jacquard Products makes it simple to create this ancient natural dye using their Indigo Tie Dye kit here.
These techniques I share are unique and easy to customize. They’re not your traditional tie dye patterns and the indigo blue is stunning in different shades. Want a deep indigo? Leave the t-shirt in for longer and for lighter shades just a quick dip in the vat (the bucket of dye). Although an ancient craft, shibori is on the rise in popularity as seen used on top designers spring and summer 2017 collections. Check out the tutorials below to create your own!
Nui Shibori
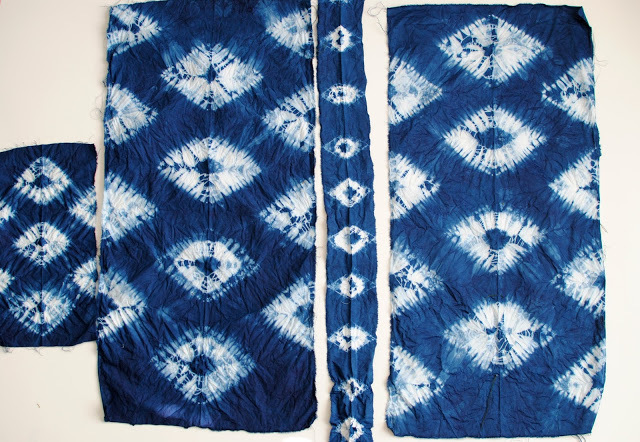
These first ones are a type of shibori called Nui Shibori (stitch resist dyeing). This is a simple running stitch used on the cloth, then pulled tight to gather the cloth. Each thread is then secured by knotting before being dyed. It’s a bit more time consuming but allows for control of the pattern you’d like to create.
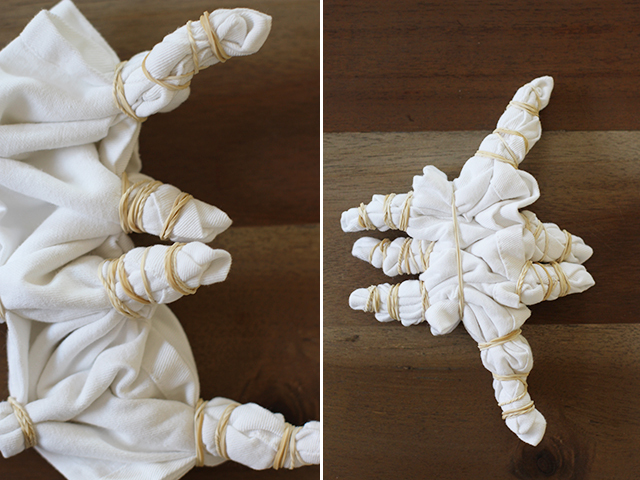
Komasu Shibori:
Place your cotton shirt so the front and back align at the sides and sleeves are in the middle. Create a template or free hand and draw triangle shapes along the folded edges. I use a water erasable pen as it disappears in water. Then use a running stitch with heavy weight thread (for buttons or denim) and trace the marks. Pull the stitches on the side without the knot till they're nice and bunched up and knot the end a couple times. Once they're all scrunched use rubber bands around the tips. Dampen the t-shirt (you don't want it soaking wet just barely damp) and place in the Indigo vat. I wanted a deeper shade of blue so I placed mine in for 3 minutes. Let the dye oxidize and then I let it dry till it's just a little damp and remove the rubber bands and stitches with embroidery scissors.
Nui Shibori
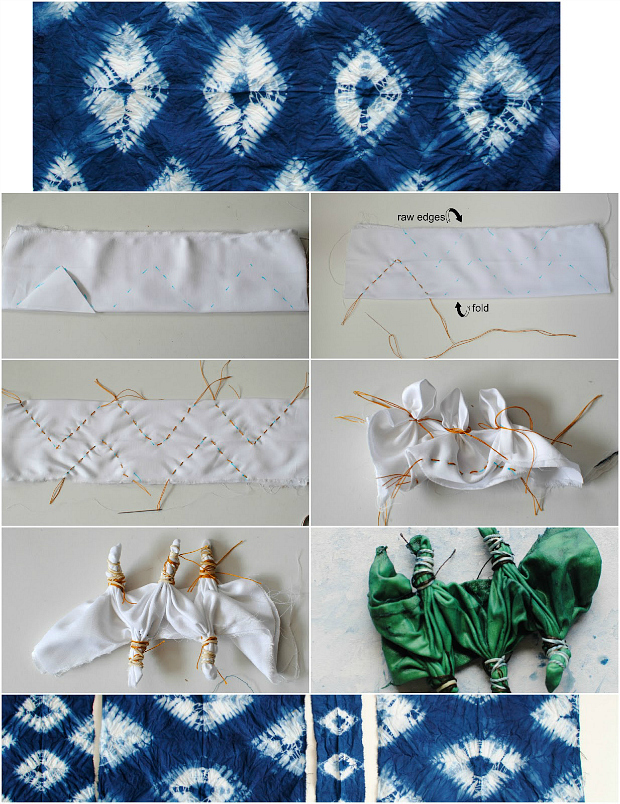
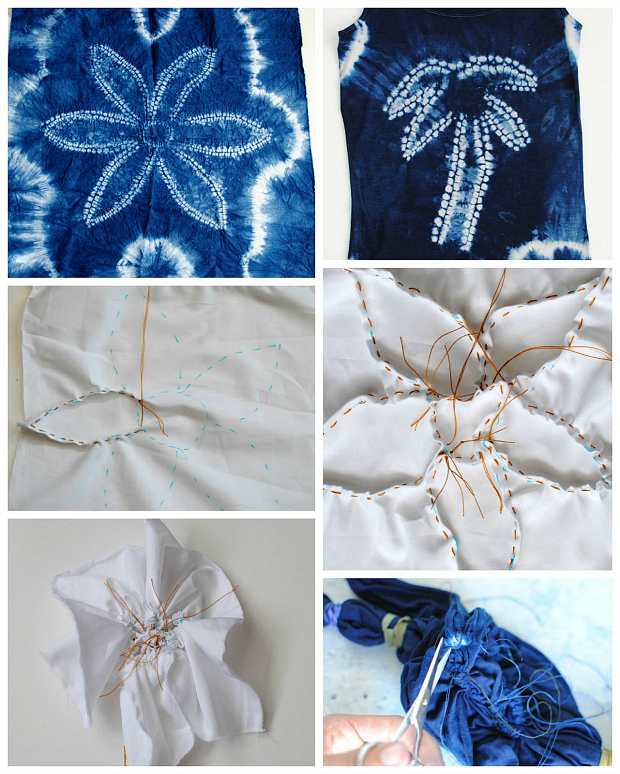
Another form of Nui Shibori. This one you will create a design on paper first. I then placed it in between the front and back of t-shirt and traced it with my water erasable pen. This time I used a running stitch but I folded the fabric while I did it as shown in the photos. I also did an individual set of stitches for each petal (or section) for when you pull the threads. Pull the threads so they're scrunched tightly, tie the knots for each section and dampen it lightly. Place in the Indigo vat for 2 - 3 minutes or until you've achieved the shade of indigo you like. After it has oxidized (when the fabric is removed from the indigo vat it's a greenish color, once exposed to air it turns to blue) and slightly damp, remove the stitches and rubber bands.
Itajime shibori
A traditional shibori pattern but one you can’t go wrong with. You will fold the shirt in an accordion pattern (back and forth). Once you’ve created a strip you will then fold that again back and forth till it’s a big square. Bind the folds with rubber bands, dampen and place in the Indigo vat for 2-3 minutes.

Boshi Shibori
Another traditional shibori technique called boshi shibori. This is done by binding sections of the t-shirt with rubber bands or string. You can do them all over or in different sections. Place in the Indigo vat and follow the previous steps...
Shibori Pro tips:
- Have a plan: Before preparing your vat and t-shirts, have a plan. I use to just go with the flow but now I like to have set designs in mind. It keeps things organized and then later on your not wishing you had more of a certain pattern or less of other patterns.
- Take notes! How long you should leave the t-shirts in? What t-shirts did you use? What binding techniques you used and the steps (I’l take photos not only for my blog but for myself). This helps especially if you’re using several different patterns…Jot down suggestions for next time.
- Don’t rush! Shibori and Indigo dyeing is a process. The vat stays good for a few days and the Jacquard Indigo kit you can dye up to 25 shirts so that’s a lot of dye to use and plenty of time. If you want lighter shades of indigo save those for the end when less dye is available. It’s a process of binding and using stitch resist techniques so take your time.
- Wear clothing and shoes you don't care to get messy. You will get dye on you no matter how hard you try not to. So wear clothing and shoes that you don't mind getting indigo on. For me I just wear a previously dyed indigo shirt (with no set pattern) and flip flops. I always wear gloves but my hands still get dyed because I choose to remove the rubber bands and thread with bare hands mainly because it can be difficult with gloves on.
- Dyeing time: For me I leave mine in for a good 2-3 minutes and will remove it from the vat and let it “oxidize.” If I want it darker then I put it in again for a minute or so…If you want a lighter shade you can just quickly dip it in, agitate it a bit and then remove it. Also if you want lighter shades for certain fabrics, save them for the end when there is less dye left in the vat. You can even add more water at this point and it get some lovely light shades of indigo.
Nothing says summer like a tie dye party! Grab some ShirtSpace t-shirts and Indigo Kit here and use these techniques to create some fun looks!

Comments
Danna09/28/2025 01:36 pm
Nice designs! All of the examples appear to be woven fabric instead of knit t-shirt fabric? Are any of these a good example of the level of detail you can achieve on a knit fabric like tshirts?
Reply
ShirtSpace09/29/2025 05:02 pm
Hi, Danna! Thanks so much for your thoughtful question! You’re right—many of the examples in our blog feature woven fabrics, since shibori is traditionally practiced on those materials. That said, the technique can absolutely be done on knit fabrics like t-shirts. Because knits stretch differently than wovens, the details of the pattern may look a little softer or less crisp, but you can still achieve beautiful results. Larger, bolder designs (like spirals, stripes, or bullseye effects) tend to show up best on t-shirts, while very intricate folds may blur slightly on the stretchy knit surface. If you’d like to try it out, we recommend starting with 100% cotton t-shirts—natural fibers take dye most evenly—and experimenting with a few different binding methods to see which look you prefer. You’ll still get that unique, organic character that makes shibori so special!
Reply
Val04/14/2021 08:48 pm
I really enjoyed this article and will being trying it real soon
Reply
Leave a Comment
We take your privacy seriously and will not share or publish your email address.
This site is protected by reCAPTCHA and the Google Privacy Policy and Terms of Service apply.