
How To Decorate an Apron for the Holidays | ShirtSpace
By ShirtSpace | Nov 09, 2020 | Updated Feb 28, 2024
To celebrate national “Tie One on Day” , which always falls on the day before Thanksgiving and celebrates donning an apron to prepare a large meal for our friends and family, our family here at ShirtSpace wants to share how to decorate an apron for the holidays so that you can be the hottest thing in the kitchen this year. Many of you are probably surprised that ShirtSpace stocks aprons. Afterall, we are named after the almighty staple of everyone’s closet, the t-shirt. But we want to let you in on a little secret, ShirtSpace has a wide variety of awesome blank apparel products at wholesale prices, including multiple colors and styles of aprons for a project like this.

There’s a reason people always mention putting on a few pounds around the holidays and it's because there is just too much delicious food to pass up, especially if you are fortunate enough to have a talented cook in the family. Between Thanksgiving, Christmas, and all the festive holiday events in the middle, you can show off your cute custom apron design and have it for future years to come. Whether you prefer a funny or heartwarming message, a fun graphic or character design, or even something a little out-of-the-box and artsy, you are sure to read this article and leave with some major inspiration about how to spice up your holiday apron game.
We also wanted to feature multiple DIY methods of apron customization, to show you that the sky's the limit for creative ways to dress up a blank apron for the holidays. If you like heat transfer vinyl projects, tie-dye, embroidery, fabric paint, or screen printing, we have something for every crafty cook in the kitchen.
How to Decorate an Apron for the Holidays
We Whisk You a Happy Holiday Season
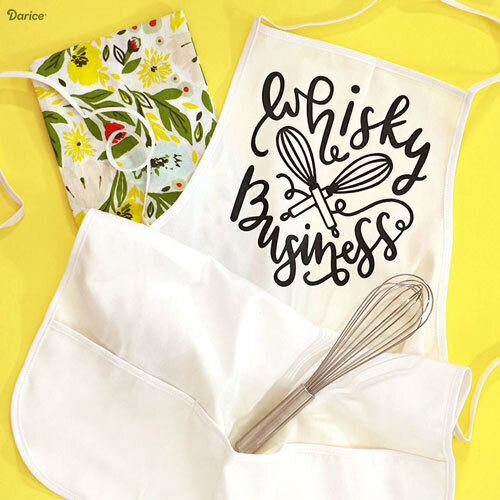
Image Source: Darice
We love this beautifully stylized font and graphic combo, but we love a good pun even more! Darice shares an informative step-by-step tutorial on her blog about how to create this custom apron using heat transfer vinyl, a vinyl cutting machine, an iron, weeding tools, parchment paper, and a free downloadable template file. She also gives the tip to remember to mirror (horizontally flip) the design so that the text appears the correct way after ironing it onto the fabric. Also, we always like to remind you to remember to consider the vinyl manufacturer’s heat settings and tips every time when using heat transfer vinyl on fabrics.
When selecting an apron for this project, there are tons of styles and options available, but be sure to check the material make up when making your choice. For heat transfer vinyl projects, we recommend 100% polyester or cotton/poly blends, such as Port Authority’s A600 or Bayside’s BA4350, for the best results. We even have many options beyond these at ShirtSpace.com. Check out the video at the end of Darice’s article to get visual instruction on how to achieve this apron look.
To add some extra holiday flare, you could include sprigs of holly and berries around the original graphic. If you haven’t tried a heat transfer vinyl project before and are nervous about trying it, we vote be a “whisk taker” and go for it!
Other fun quips we think you should also consider for a similar project to make your own:
-
If you love Elton John or savory strips of pork, or both - Don’t Go Bacon My Heart
-
For the competitive soul - Leftovers Are For Quitters
-
For confident kings and queens of the kitchen - Hot Stuff Coming Through
-
For the sassy chef - Your Opinion Wasn’t In The Recipe
I Spy With My Little Dye
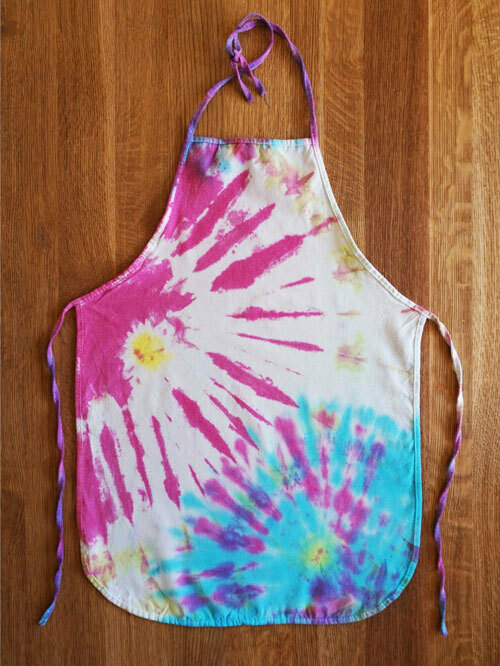
Image Source: The Crafty Cucumber
Tie-dye projects are such a fun, easy and inexpensive way to deck out any piece of blank apparel. This is a great customization method for year-round or when decorating an apron for the holidays. It’s also an activity that even kids can do, so have a craft day with the whole family! We love the colors of this apron, but we also think a pretty fall palette of dye colors for Thanksgiving or a white apron with red and green dyes for Christmas would have great results.
If you are looking for tying techniques to create different patterns, The Crafty Cucumber shares some tips on their blog showcasing this apron, and also in another helpful blog post focusing on alternative tie-dye techniques. ShirtSpace also has an informative blog post tutorial explaining how to tie-dye and an instructional video available as well. For more advanced or creative techniques, there are hundreds of other how-to guides and inspiration pictures available with a simple search engine query, visit to pinterest, or quick watch of youtube videos with unique and imaginative designs.
We recommend using an 100% cotton apron for this project because the dye will adhere to natural fibers better than synthetic ones. Use the Port Authority A510 for those who prefer a shorter apron, and for those that like a longer style we suggest the Port Authority A500.
A Plot for Polka Dots
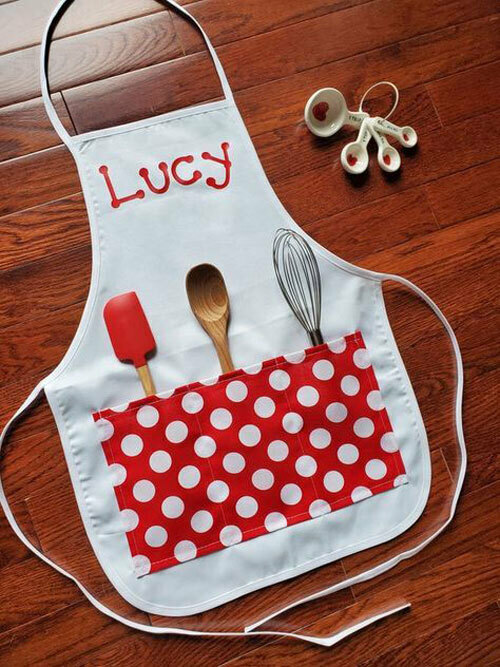
Image Source: Growing Roots Shop
We love this pop of color for children and adults alike. It does require a little sewing but with simple straight lines, even an amateur with a needle and thread could hand stitch the fabric pocket addition on with a little time and patience. You could also try fabric glue as well to attach the pocket. Use any fabric you wish to stand out from the plain background of the apron. We adore the polka dots but also think a chevron pattern, plaid, an autumn leaf pattern or a fun holiday design would be just as cute. With the addition of a couple utensils for the pockets, this project would make a great gift for any chef, young or old!
As for the name on the top portion of the apron, you could achieve this with heat transfer vinyl or with fabric paint. The fabric paint may not look quite as precise as vinyl lettering, but it may be a sweet touch if you wanted your child’s personal handwriting to be included. If you choose to go the fabric paint route, a stencil may also help to achieve cleaner lines than freehand painting. For this project, we recommend using the Big Accessories APR54 because it doesn’t come with any pockets and is very similar to the apron pictured above.
Hands Down, a Great Apron

Image Source: Imperial Sugar
We got this turkey handprint apron inspiration from Imperial Sugar. This concept is awesome because it’s super easy to recreate, and the beauty of it is that it doesn't have to be perfect to look good. You can even get kids involved for this one if you don’t mind a tinier turkey. All you need is some fabric paint, a brush for the smaller details, as well as to apply to your fingers, and voila! You have a turkey that’s safe from being Thanksgiving dinner.
We really liked using this technique (hand stamp art) to create other motifs on aprons. Here are some ideas we came across and felt deserved honorable mentions:
-
Live. Read. Create. Thrive! shares an imaginative idea that includes fanning the hands out to make a flower printed apron and then with a brush painting on the stems and leaves.
-
Old Salt Farm shares a darling apron that is decorated by letting all the special little ones in your life put their handprints on the apron and labeling them with their names. You can use heat transfer vinyl or screen printing for the names before the handprints are applied, or let them paint the names in their own handwriting, depending on the child’s age and ability.
-
Glued to my crafts has a very detailed tutorial with steps on how to create a BBQ grill apron with heat transfer vinyl and utilizing an orange handprint to serve as the flames.
The Gingerbread Man Can
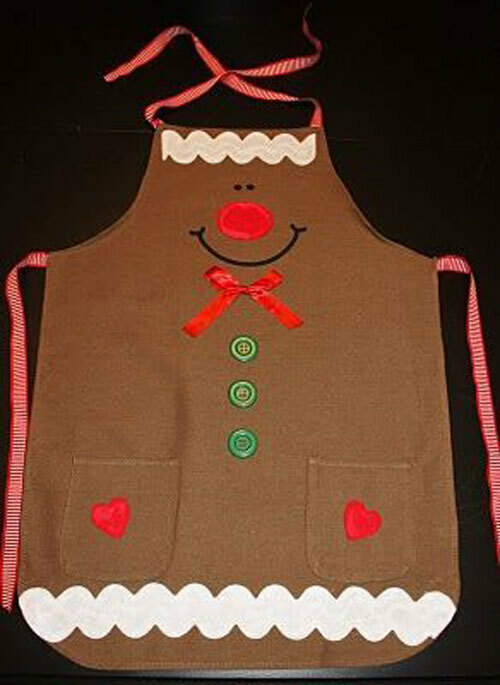
Image Source: My Little Cottage in the Making
Simple, cute and festive, this apron is easy to make but no one has to know- secret’s safe with us! We got this sweet idea for an apron from Joanne from My Little Cottage in the Making. To achieve this look, we recommend shopping the Augusta Sportswear accessories to find the perfect apron for you!
For the ties, you can cut off the strings that come on the apron and sew on gingham ribbon, or use fabric glue to attach the ribbons over the original strings for extra support when tying the apron on. Sew or use glue to attach the buttons and red ribbon bow tie.
The eyes, nose, mouth and hearts can be created multiple ways. You can either use heat transfer vinyl or screen printing to adhere these to the apron, or you can use fabric paint. For those that enjoy embroidery, this would be another (more detailed) option. The white ruffles at the top and bottom can be made with different methods as well. Either find a similar ribbon and fabric glue it or sew it in place. Sewing machine skills help, but hand stitching is a totally viable - although time consuming - option as well. You could also try using a stencil and apply a few layers of fabric paint.
Rebel Without a Claus
Your friends and family will be saying “Santa, baby!” with this super easy to make Christmas apron fit for the big guy himself. When looking for an uncomplicated method of how to decorate an apron for the holiday season, this design is a top contender. If you are a visual learner, check out the video above to see exactly how we pulled it off. We used the Liberty Bags 5502 in red to create this jolly apron. Supplies you will need include medium to thick black ribbon, a gold belt buckle (we purchased ours on Amazon here), white furry trim (fabric or ribbon), fabric scissors and fabric glue.
First, lay your blank apron out on a flat surface facing up. Then measure out your black ribbon to cover the length of the waist on the apron, with a little extra length on each side. Next, slide your belt buckle onto the ribbon and bring it to the middle.
With the front side of the ribbon and buckle face down, begin to apply glue to the back side of the ribbon. Try to smooth out the glue with the tip of the bottle to avoid bubbles. Leave the excess ribbon that hangs off the sides without any glue for now. Also, try not to apply the glue too close to the edges of the ribbon, so that it won't seep out the sides. After applying the adhesive, flip the ribbon over and carefully place it on the apron, making sure it goes straight across, and the buckle is centered. Smooth out the ribbon against the apron to make it flush. Repeat this same process with the furry white trim on the top and bottom edges, omitting the belt buckle part.
Let the apron sit for the allotted amount of time your fabric glue calls for (pro tip: quick-dry formulas are worth the few extra bucks, especially if you are strapped for time or slightly impatient). Once the ribbons are fairly secure to the fabric, flip the apron over and secure the excess ribbon you left hanging off the sides. Simply glue the loose ends around the edges and onto the backside of the apron. If your belt buckle seems to slide around or doesn’t stay in place you can secure that down with a little fabric glue or by using a hot glue gun as well. After the glue is completely dry for all areas, you are ready to go make all of your favorite holiday treats! Finishing off with a Santa Claus cap is optional but highly recommended.
‘Tis the Seasoning
There you have it folks, with so many festive holiday apron crafts to choose from, how will you decide? Nothing is stopping you from making more than one, because these decorated aprons make fantastic gifts. The holiday season is about gratitude and giving, and what better way than gifting an awesome holiday apron, made from the heart? We hope this article inspired you to create something festive with our examples of ways to decorate an apron for the holidays. Tell us what fun holiday apron you decide to make in the comments below, either from this list or your own creation. Have a happy holiday season!
Leave a Comment
We take your privacy seriously and will not share or publish your email address.
This site is protected by reCAPTCHA and the Google Privacy Policy and Terms of Service apply.