
How to Reverse Tie-Dye With Bleach on T-Shirts
By ShirtSpace | May 16, 2023 | Updated Jan 24, 2024Reverse tie-dye with bleach, or bleach dyeing, is a fun and easy way to give your garments a new look. It’s a fun spin on traditional tie-dye, that really stands apart! In this article, we'll walk you through the process of how to reverse tie-dye with bleach, from choosing the right wholesale t-shirt to perfecting your technique.
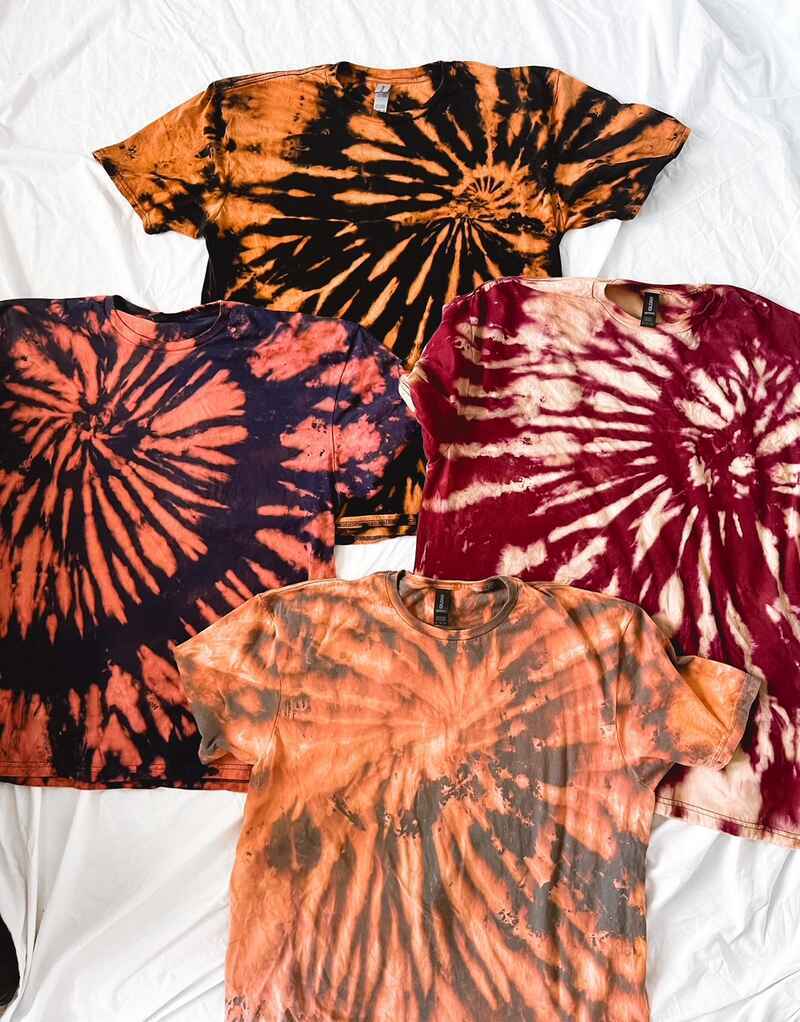
Hero image credit: Black, navy, maroon and charcoal reverse tie-dyed Gildan shirts by To Dye For MD.
There are many tie-dye methods, but this one is definitely unique. Reverse bleach tie-dye is a technique that involves using chemical bleach to remove the color from a piece of clothing, creating a unique, muted pattern. This process can be done on any color shirt, but the results will vary depending on the color and pattern of the shirt. If you complete this process with a dark-colored shirt, such as black or charcoal, you can tie-dye the garment again and get little slices of tie-dye pattern throughout the piece of clothing.
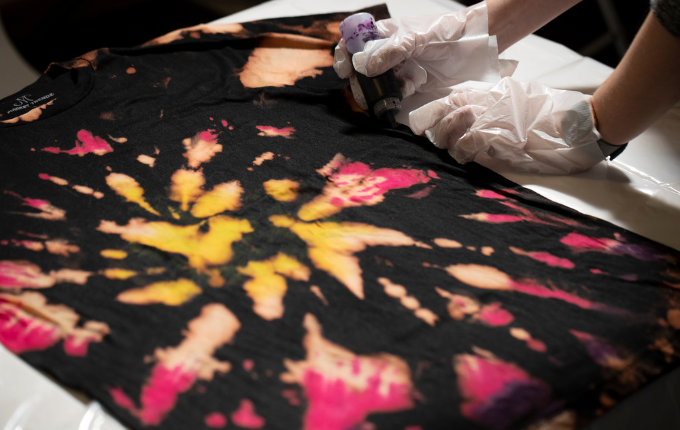
Image credit: Brian Sevald with Getty Images.
Before we get started, let's talk about the basics of bleach! Reverse tie-dye wouldn’t be possible without it! Unlike traditional tie-dyeing, where fabric is dyed with colorful dyes, this method uses bleach to remove color from the fabric. The bleach reacts with the fabric's dye molecules, breaking them down and removing the color. This creates a pattern on the fabric that can be manipulated in various ways to achieve different effects.
What You'll Need for Reverse Tie-Dye With Bleach
Before you start reverse tie-dyeing with bleach, you must gather a few supplies. Here's what you'll need:
-
A t-shirt: The darker the color the better if you plan to re-tie-dye the shirt after bleaching.
-
Bleach: Use bleach safe for fabric, such as Clorox.
-
Rubber gloves: Protect your hands from the bleach with rubber gloves.
-
Spray bottle: Use a spray bottle to apply the bleach to the t-shirt.
-
Hydrogen peroxide (10% or lower concentration)
-
Plastic wrap: Cover the t-shirt with plastic wrap to prevent bleach from drying out too quickly.
-
Water: Rinse the t-shirt thoroughly with water after bleaching it.
-
Sunshine (optional, but helps the process along!)
Choosing the Right T-Shirt for Reverse Tie-Dye
When choosing a t-shirt for reverse tie-dye, there are a few things to keep in mind. When selecting a t-shirt for reverse tie-dyeing, just as with standard tie-dye projects, it's essential to choose a shirt made of 100% cotton or a cotton blend. Even synthetic fibers like polyester and nylon will either not react to the bleach or will become damaged or discolored, so they will not create the same effect on the fabric. If you select a shirt made solely from cotton, be careful with the bleach since it can easily wear holes in cotton if left on to process too long.
Additionally, the color of the shirt will affect the final result. Remember that darker-colored shirts will have more dramatic results, while lighter-colored shirts will have more subtle results. Keep in mind that the bleach will also affect the texture of the fabric, so the final result may be different than expected.
Preparing Your T-Shirt for Reverse Tie-Dye
Before you start bleaching your tie-dye t-shirt, there are a few steps you'll need to take to prepare it. Follow these instructions carefully to set yourself up for a successful DIY reverse tie-dye with bleach project.
-
Wash the t-shirt: Start by washing the t-shirt to remove any dirt or oils on it. This will help the bleach penetrate the fabric more evenly.
-
This next step is debatable. Some people prefer to start applying bleach to a dry t-shirt. If the shirt is damp, the bleach may not penetrate evenly, and the reverse tie-dye effect may be less dramatic. Others prefer starting with a wet shirt. This depends on what works best for you, but we always recommend testing before carrying out a large decorating project.
-
Make sure the area you work in is well-ventilated since bleach can have a strong chemical stench.
-
Protect your work area: Cover it with a tarp, plastic, or newspaper to protect it from bleach spills.
-
Protect your hands from the bleach by wearing rubber gloves. Wear a face mask to avoid inhaling harmful chemicals.
-
Mix equal parts bleach and water in a spray or squeeze bottle. The amount you'll need depends on the size of your shirt, but start with 1 cup of each and adjust as needed.
Step-by-Step Guide for Reverse Tie-Dye With Bleach
Now that your t-shirt is prepped and ready, it's time to start reverse tie-dyeing with bleach. Follow these steps for the best results:
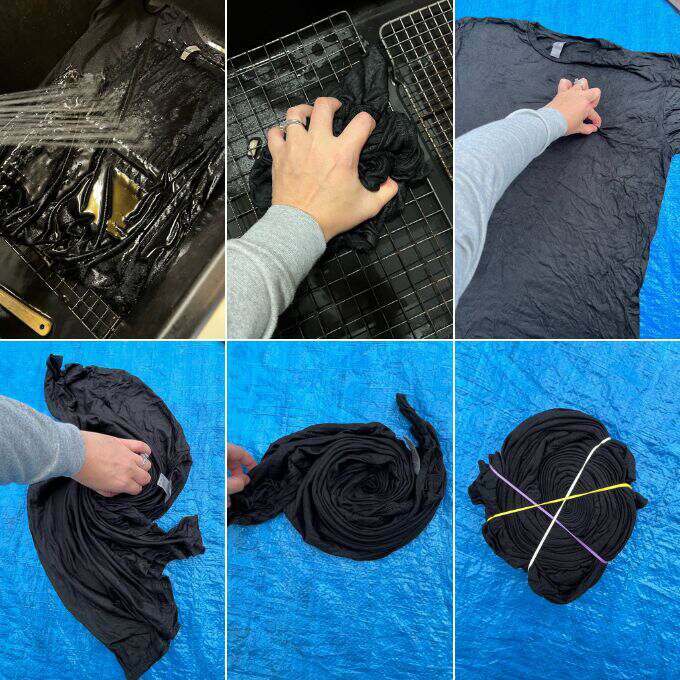
To Dye For MD creating a spiral design by pinching the fabric and twisting.
-
Be sure you start the project wearing clothes you do not mind getting dirty or bleach-stained.
-
Lightly rinse your shirt in cold water if you want to start damp, and rinse out any excess water.
-
Lay the t-shirt flat: Lay the t-shirt flat on your work surface.
-
Create your design: Use rubber bands, string, or zip ties to secure the shirt’s spiral, folds or crumples you create. The areas that are tied off will remain the original color, while the areas that are not tied off will be bleached.

Images courtesy of To Dye For MD.
-
Spray the bleach mixture onto the areas of the shirt you want to lighten. The more bleach you use, the more dramatic the effect will be. When reverse tie-dyeing, bleach with caution. Remember that the bleach will continue to work overtime, so don't over-saturate the shirt. Flip the tied shirt over and get the other side and edges.
-
Once you've applied the bleach, wrap the shirt in plastic wrap to keep the bleach from drying out and let it sit for 10 minutes. Check on the shirt every 5 minutes to monitor the bleaching process.
-
Then take the wrapping off and let it sit for another 5-10 minutes. You could be waiting even 30 minutes to an hour, depending on how much color you want to remove. Be sure not to let the bleach sit too long, or it will eat holes through the material of the shirt!
-
OPTIONAL: Rinse the shirt with hydrogen peroxide to neutralize the bleach, letting it absorb into the fabric and then waiting to let it sit for a few minutes. Rinsing with water is not enough to completely stop the bleach from working. The chemical molecules get trapped in the fibers and continue to process over time, sometimes weakening the fabric enough to leave holes down the road.
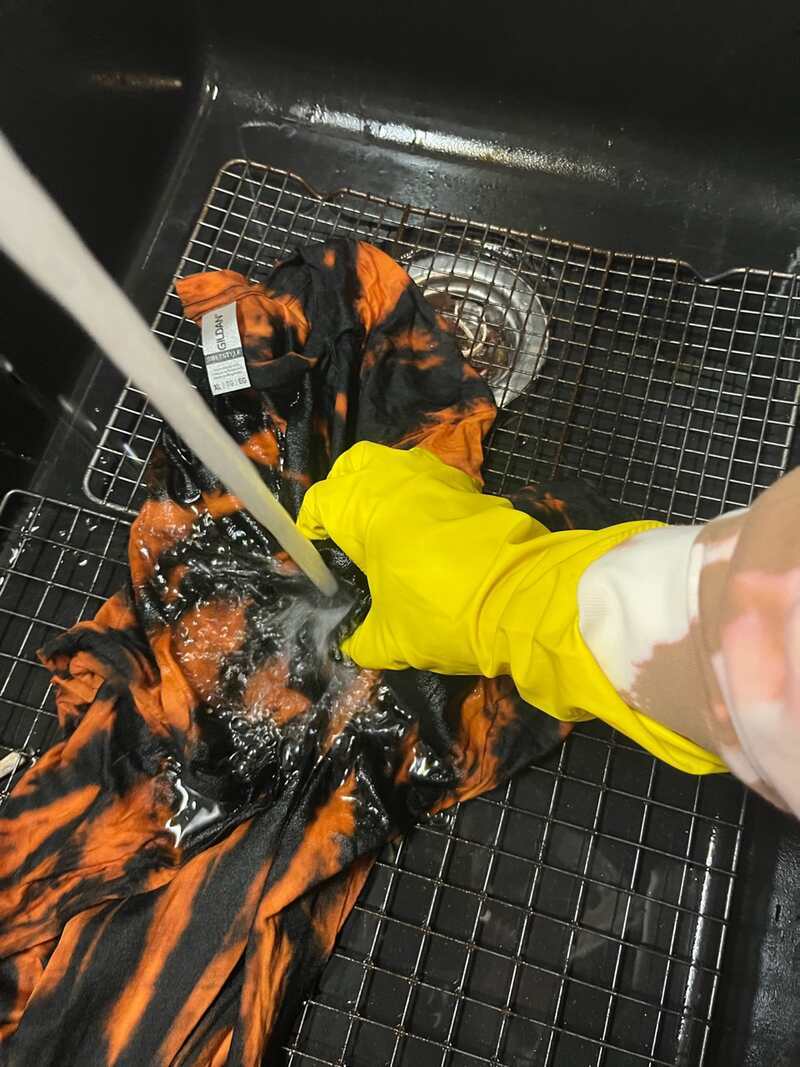
Images courtesy of To Dye For MD.
-
Rinse the shirt with cold water to remove any excess bleach until you see no bubbles. Be sure to do this thoroughly because the bleach can bleed and fade the non-bleached areas of your shirt if you do not remove it all.
-
During this rinding process, remove the rubber bands or string to reveal your reverse tie-dye pattern. Be sure to wear gloves to avoid getting bleach on your skin.
-
Wash the shirt in the washing machine with a small amount of detergent to remove any remaining bleach. Use cold water to prevent further processing of the bleach. Avoid using hot water or bleach in the wash, as this can damage the fabric and undo all your hard work.
-
Dry on a cool heat cycle or air dry.
-
Enjoy your one-of-a-kind creation!
Images courtesy of To Dye For MD.
Tips and Tricks for Perfecting Your Reverse Tie-Dye Technique
-
Experiment with different tying techniques to create different patterns and effects. You can also try using stencils or tape to create more complex designs.
-
Always do a practice run with a garment before committing to a larger project. The effectiveness of bleach on a piece of clothing is often hard to predict and depends on a number of factors, including fabric, dye, and the manufacturing process used. Test your bleach solution on a small, inconspicuous area of the fabric before applying it to the entire shirt. This will help you gauge the color change and avoid any unwanted surprises.
-
When you reverse tie-dye, bleach lightly. You can always go back and add more. Use a spray bottle with a fine mist setting to apply the bleach solution more evenly and avoid over-saturating any area.
-
Also, avoid using too much bleach because it can weaken the fabric and cause holes or tears, especially on lightweight 100% cotton t-shirts.
-
Consider using a color remover before applying the bleach to create a blank canvas for your design. This can help create a more vibrant and even color change.
-
Use the sun to your advantage! Natural sunlight helps make the bleaching process more effective and faster.
-
Take your time and have fun! Reverse tie-dyeing is a creative and experimental process, so don't be afraid to try new things and see what works best for you.
-
You can always re-tie-dye over a black bleach-dyed shirt for a wonderful effect. For instance, if you let the bleach process enough to get the fabric very light (almost white), you can tie-dye bright and vibrant colors onto the white portions.
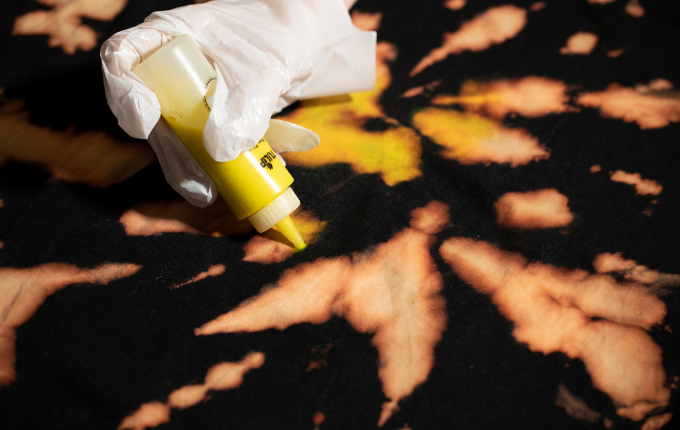
Image credit: Brian Sevald with Getty Images.
Customer Feature: To Dye For MD
1. Tell us a little bit about yourself
Hi there! My name is Erika, and I am the Owner and Co-Founder of To Dye For MD, along with my husband, Nick. We live in the mountains of Maryland with our 2 daughters, aged 2 and 5 months! I am a Stay At Home Mom, as well as a working Mom, as TDF has become a full-time job for me. We are so grateful!
2. Tell us about your brand. How did you fall into bleaching and tie-dyeing to start your business?
I worked in outside beer and liquor sales for 8ish years and was laid off during the COVID pandemic in 2020, three weeks after having our first daughter. We purchased 2 shirts from Goodwill, bleach dyed them, and since then have hand dyed 6,500 shirts (mostly secondhand tees) and collaborated with over 20 local businesses on merch. We also co-host Pop-Up Thrift Markets with another local business, Daydream Thrift, at Olde Mother Brewing Co., which is an amazing local brewery in Frederick, MD!
3. What is one tip you would give to someone just starting out with reverse tie-dyeing with bleach?
It takes time to perfect your craft and figure out different fabrics and how they work! Everyone does different bleach/water ratios, ties their shirts differently, and has different creative visions. Don’t give up, and have fun. Every piece is a true work of art!
4. What is your favorite ShirtSpace blank to use for reverse tie-dye?
When we are not thrifting apparel, we like to use Gildan Softstyle t-shirts. They are at a great price point and super comfortable!
5. What makes a garment a good candidate for reverse tie-dye?
I always suggest 100% cotton items for the best results! The more synthetic material (like polyester), the less vibrant the result, if there is even a result at all. The garment must have at least 50% cotton. Dark colors will almost always work (black, navy, charcoal, maroon, purple, etc.). I tend to stay away from lighter colors as the bleach can overpower a shirt and completely strip the color.
6. What are some common mistakes to avoid when reverse tie-dyeing with bleach?
Always check your fabric! Even if something “feels” cotton, you will often find it to be polyester or other synthetic materials. Also, when we started, we commonly bought concentrated bleach instead of regular bleach, which is thicker and goopy. It does not mix up with water! We always suggest regular household bleach.
7. What is one super useful tip you have to share for successful reverse tie-dyed designs?
SUNLIGHT!!! Sunshine is a bleach tee’s best friend. But don’t let it sit too long (longer than 15–20 mins), or the bleach can eat through the shirt and cause the fabric to get holes. Bleaching outside is super beneficial, and the sun helps speed up the bleaching process and create a beautiful and vibrant result. Colors like red, orange, yellow, and gold can be difficult to bleach dye, but the sun can help create a bigger contrast as compared to doing them inside your house with no natural light.
8. Do you provide custom pieces for your customers?
We do not. We are very busy with in-person pop-up shops, online sales, networking/marketing, and raising our children. However, we collaborate with local businesses on merch and put out 40-60 new items every 2 weeks!
9. How do you market your business and get sales?
Our biggest platform for marketing and networking is Instagram! In 2 and a half years, we have organically gained about 4,500 followers. Marketing is just as important as making beautiful art. Stay true to yourself and your brand, and you will be successful!
We do Story Sales to sell new items, which our customers love, and it’s so much fun! A Story Sale is where we post 40-60 new items every 2 weeks on our IG story, and all items are first come, first served. With us using secondhand upcycled clothing, our customers know that every piece is truly one of a kind, so they will wait for our sale to start, so they can grab the pieces they want!
We also do in-person pop-up shops at local breweries and venues 1–2 times per month. We love selling in person and getting to connect with our customers and new customers face-to-face!
10. What are your favorite brands to use for bleach and dye?
I typically buy Clorox or store-brand regular bleach (not concentrated bleach). We like to do a 50% water/50% bleach ratio in a squeeze bottle to apply dye to our shirts!
When we aren’t bleach-dyeing and tie-dyeing instead, we love to use Dharma Dyes!

Image courtesy of To Dye For MD.
Now Go Out & Reverse Tie-Dye Today!
Tie-dye is everywhere now, from retail stores to custom boutiques! So, why not take your tie-dye skills to the next level with reverse tie-dye designs!? Do you have any helpful tips on how to reverse tie-dye with bleach? Be sure to share them with us in the comments below, and happy crafting!
Comments
Megan A04/10/2024 12:05 am
Hello! I am having trouble with my first reverse tie dye. I'm doing (2) 60/40 cotton blend sweats outfits. One black and one dark gray. I started with the gray and had almost no result. I ended up leaving the bleach on close to an hour because of the lack of results I saw. The bleach did nothing but barely lighten the gray color and was barely noticable. I did a small spot ont the black and as soon as I applied the bleach, I immediately saw very noticeable results. They are the same outfits just different colors, why such grest results with the black outfit and practically no change on the dark gray??? Thank you so much for your time
Reply
ShirtSpace04/10/2024 04:52 pm
Hi, Megan. This is quite a conundrum. Without knowing the exact brand and style to look into how the product is manufactured, this is our hunch – we suspect the gray dye used is more colorfast and resistant to bleach than the black, making it much harder to remove color from, if even possible at all. Another interesting fact about bleach that might be relevant is when you are bleaching hair, it's harder to bleach gray hair lighter than dark hair. Why is that? Because there is less pigment in gray than in black. When bleaching gray fabrics, you should be able to achieve a lighter gray or almost blue-ish tint, but this might not be the case with all gray garments. We are sorry you are having trouble bleaching gray and hope this response helped gain a little clarity as to why this is happening. Also, best of luck with your bleaching adventures!
Reply
Leave a Comment
We take your privacy seriously and will not share or publish your email address.
This site is protected by reCAPTCHA and the Google Privacy Policy and Terms of Service apply.